The BitFenix Phenom Mini ITX case is another small form factor PC case from BitFenix, and today we are going to take a closer look at it and review the case. The Phenom series is actually quite similar with the Prodigy series. The Phenom has a mini ITX and micro ATX variants, just like the Prodigy. Both case models may look different from the outside but they share a similar design on the inside. The Phenom mini-ITX has a similar layout with the Prodigy, and the Phenom micro-ATX has a similar layout with the Prodigy M. But today, we are just going to focus our attention on the Phenom Mini-ITX, and BitFenix has sent me a white one to check it out. If you are planning on building an HTPC or ITX system, please continue reading my BitFenix Phenom mini-ITX review below and find out if this is the case you are looking for.
BitFenix Phenom Mini-ITX Review
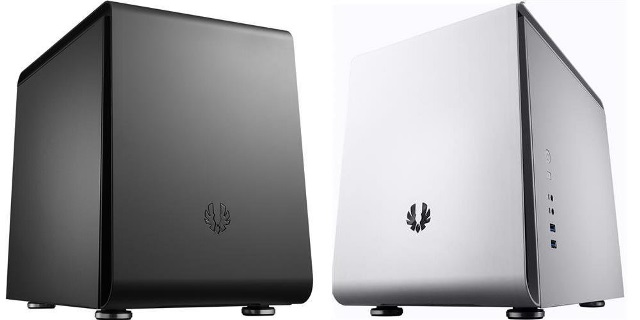
The BitFenix Phenom Mini-ITX is one of those cube type cases but it features subtle curves instead of angled edges. The front and top portion is coated in premium BitFenix SofTouch™ Surface Treatment that offers a luxuriously matte finish. It’s actually quite large for a mini ITX case compared to other mini ITX case available on the market. But it does offer a unique design and has lots of room inside.
The Phenom Mini-ITX is not only ideal for an ITX PC gaming machine, but it can also be used as a NAS chassis or a media server for your home entertainment. It can also accommodate large CPU air cooler heatsinks or water cooling system (both AIO closed loop water cooler and custom water cooling setup).
I’ll discuss more of its features and specifications as we take a closer look below. I also included a finish build to give you an idea how would it look like after putting the components inside the case.
BitFenix Phenom Mini-ITX Specifications
| Materials | Steel, Plastic, SofTouch™ |
| Colors (Int/Ext) | Black/Black, White/White |
| Dimensions (WxHxD) | 250 x 330 x 374mm |
| Motherboard Sizes | Mini-ITX |
| 3.5" Drive Bays | x 6 (5 + 1 using included adapter) |
| 2.5" Drive Bays | x 11 (5 + 2 + 2 + 1 + 1 using included adapter) |
| Cooling Top | 120mm x 2 (optional) |
| Cooling Front | 120mm x 2 (1 included) or 140/180/200/230mm x 1 (optional) |
| Cooling Rear | 120mm x 1 (included) or 140mm x 1 (optional) |
| PCI Slots | x 2 |
| I/O | USB 3.0 x 2, HD Audio |
| Power Supply | PS2 ATX (bottom, multi direction) |
| Extras | Tool-free drive locking mechanisms, SofTouch™ surface treatment, filtered intakes |
Packaging and Closer Look


The photos above show the retail box which houses the BitFenix Phenom Mini-ITX case. It has thick foams and a plastic covering that protects the case from dusts and other particles that might get in. You can also see its features and specifications on the rear and right sides of the box.


The Phenom Mini-ITX features a minimalistic, yet elegant looking design. The front and top portion has SofTouch™ Surface Treatment, that when you touch it, it feels like a smooth rubberized surface. You’ll also see the BitFenix logo in the lower middle of the case, but there’s no 5.25″ external drive bay despite having a slot inside the case. Hope they did included some LED effects on the logo though.


Generally, the case itself looks very plain, and just like the Prodigy series its side panels have a non-glossy surface and the front I/O ports are located on the right side panel area. I/O ports include a power button, reset button, mic in and audio out and two USB 3.0 ports. However, I would prefer that these ports are located somewhere else on the case and not on a removable part like the side panel.


At the back of the Phenom ITX, you can install either a 120mm fan or 140mm fan for exhaust or a radiator if you are into water cooling. There are two expansion slots just enough for most graphics cards that require only two slots. Unfortunately, you can’t install a tri-slot graphics card in this one. You’ll also see the rear I/O opening and the rectangular hole for the PSU.

Just a note, not all PSUs are compatible with the Phenom ITX. You can’t install a long power supply as it would not fit in. Again a semi modular or full modular PSU is recommended in this case. A PSU, like the Cooler Master V550, with a length of 150mm would be the limit for me. Another thing that I did not like about is its tool-less PCI slot mechanism. I find it rather not very user friendly. And I also noticed that the vertical lock or “stopper” cannot tightly hold the GPU bracket. I’d rather see something like a strong clip or lock instead. Anyway, this is just a minor inconvenience but can use some improvement.


There is also air ventilation with removable cover on top of the Phenom Mini ITX. The top ventilation supports up to two 120mm fans or radiator. The cover can easily be removed and comes with a dust filter as well.


On the bottom of the BitFenix Phenom Mini-ITX are four circular rubber feets and there is a dust filter for the power supply as well. The dust filter can easily be removed, for cleaning, simply by sliding it out.

BitFenix is using the same thumbscrews (the one on the right side) like in their Prodigy, to which I am not a fan. I would prefer an all metal thumbscrews since it is better than the other.


The BitFenix Phenom Mini-ITX has sturdy side panels. It can’t be easily flexed, and like in the Prodigy, there’s a room for two solid state drives right beside the front I/O ports.


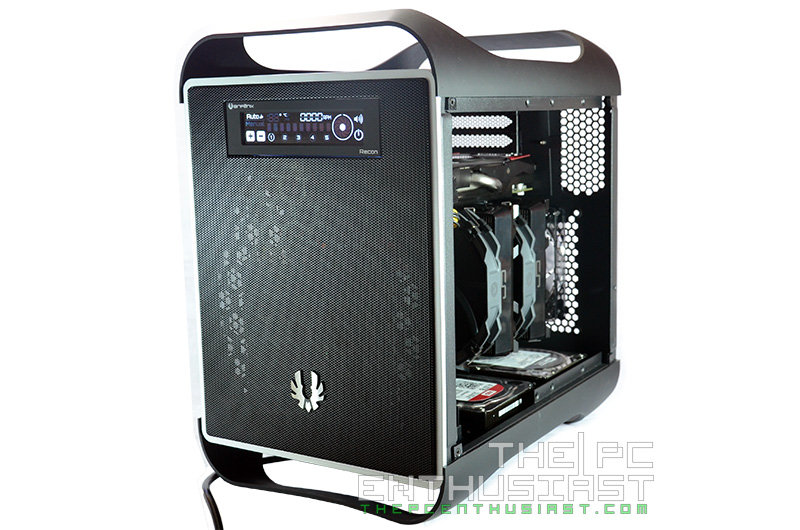
Now let’s take a closer look inside the Phenom Mini-ITX by removing its side panels. Inside the case, you’ll see a very familiar setup, just like in the Prodigy ITX variant. The drive cage is composed of two section for a total of 5 slots. You can remove the middle portion if you are planning to install a long graphics card.

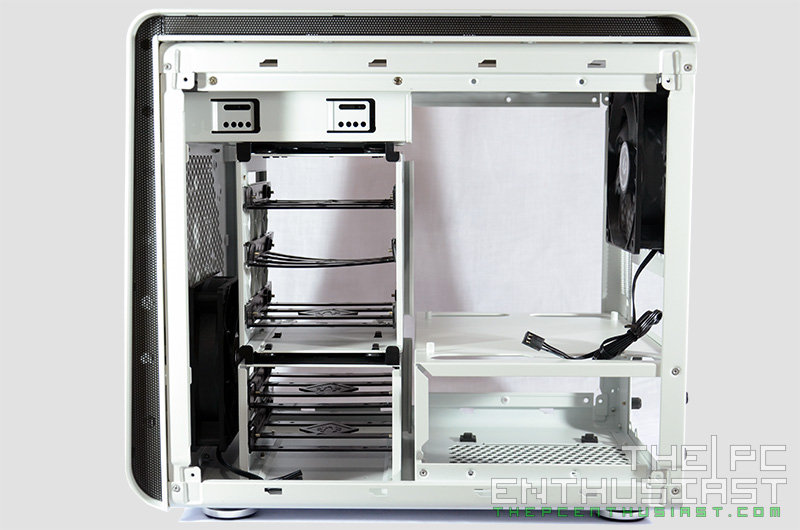

You’ll notice that there is a slot for a 5.25″ drive bay. You can use it if you plan to install an additional hard drive, but personally I think they should have just removed it to make more room, or they should have made the drive cage 1 slot higher instead. Anyway, this 5.25″ cage can easily be removed simple by unscrewing it.


By default, the BitFenix Phenom Mini-ITX comes with two standard 120mm fans. But these are just stock fans and are not that powerful. I would suggest that you replace them with a more powerful air flow case fan or some LED fans for aesthetics. The company has the Spectre Pro and Spectre Pro LED.


Here’s a closer look at the middle section removable drive cage. It features a squeeze-to-release FlexCage™, so you don’t have to screw or unscrew this section. You simply need to squeeze and slide it in or out.


The photos above show the BitFenix Phenom Mini ITX without its front cover. You can install up to a 230mm fan for air intake and to cool the hard drives. Again you’ll see that there is an opening for a 5.25″ external bay, but you can’t use it since there’s no opening on the front cover.
BitFenix Phenom Mini-ITX Case Build
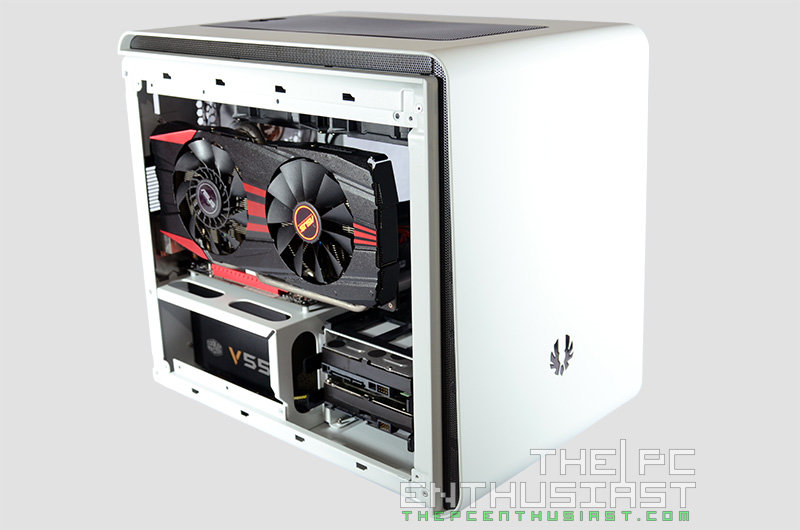

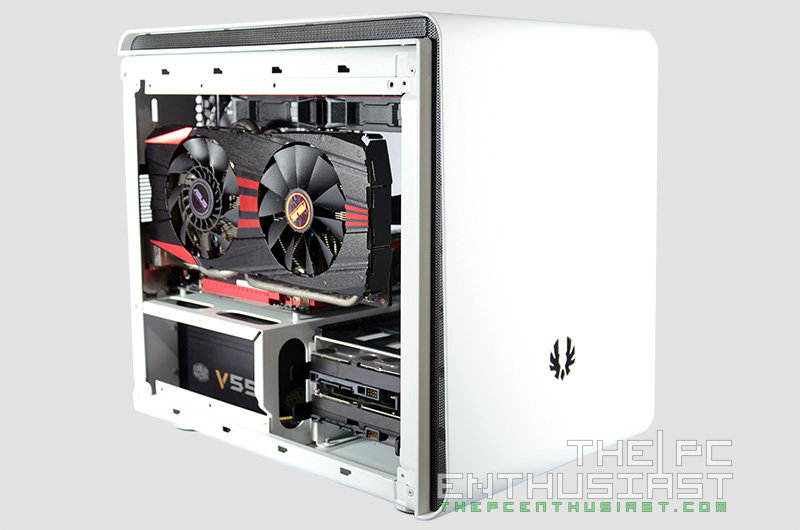
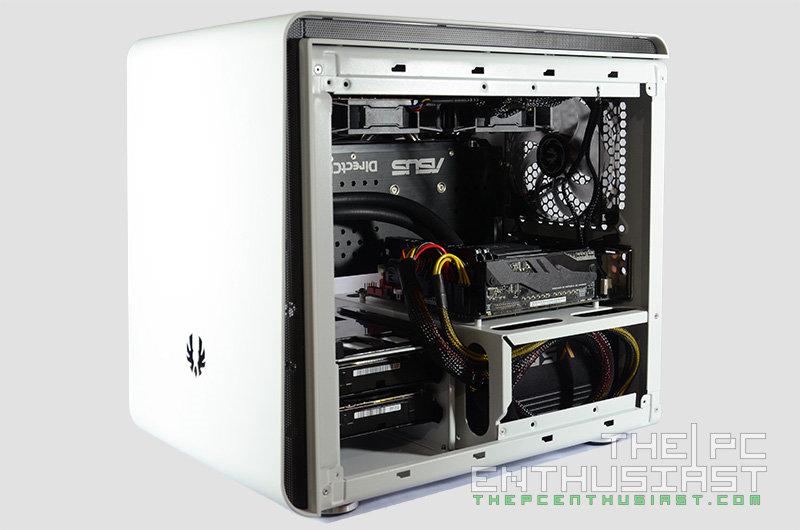
Building on the Phenom Mini-ITX was easy, and it was much easier compared to the Prodigy M I reviewed recently. But again, you need to be careful with what Graphics Card and PSU are you going to use since you can’t install a long PSU, and a very long GPU or a tri-slot GPU. I used a Cooler Master V550S instead of the Corsair HX650, since the V550S was only 150mm long and there’s still enough space for the cables.


In this build, I used an Asus Maximus VI Impact mini-ITX motherboard, with Enermax LiqTech 240 AIO water cooler for the CPU, an Asus Radeon R9 290 DirectCU II OC, a Cooler Master V550S PSU, two WD 4TB drives and 1x ADATA XPG SX900 256GB SSD.


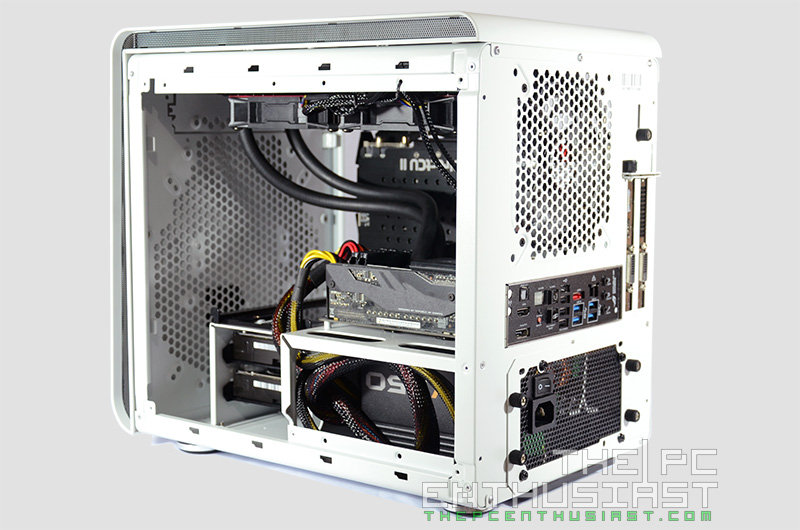
Again, like in the Prodigy Series, I wish there were holes or anchor points for cable ties so that you can properly do some cable management. Even though there is no window on one of the side panels and you won’t be seeing any cables anyway, I still think that users should at least route the cables properly for a better airflow.
The BitFenix Phenom Mini-ITX also supports tower CPU air coolers, like the Noctua NH-D14 or NH-D15, since there is an enough clearance from the top. You can install custom water cooling in this case, but you might need to do some modding, since it basically doesn’t support customized water cooling setup by default.
Price and Availability
The BitFenix Phenom Mini-ITX is now widely available and comes with a current retail price of $79.99 here for the White variant, and $79.99 for the Black variant as well. In other countries it has a retail price of around £68.95 for both Black and White, or around Php 3,500 more or less. Actual price may vary depending on the retailer and the color of the case.
BitFenix Phenom ITX Review: Conclusion
Like I said before, I consider a PC case as a matter of personal preference. Basically the Phenom and Prodigy are like siblings. Both the Phenom and Prodigy have a mini-ITX and micro-ATX variant. Both of them also share the same exact internal layout. The only difference is their outer design. The Phenom sports a more minimalistic and plain design, while the Prodigy features a stylish Mac Pro-looking design and comes in several different colors.
Now for the things that I like about the BitFenix Phenom; it’s nice and simple on the outside and the inside layout is spacious. It supports both AIO closed loop water cooling and tower air coolers as well. It’s much easier to work with compared to the layout in the micro ATX version and you can also turn this into a NAS or storage server thanks to the 5+1 bay drive cages. I also like the fact that this is one solid and sturdy case. It doesn’t easily flex and the quality of the chassis is great.
And now for the things that I do not like about this case; I’m not a fan of the white SofTouch surface since it easily attracts dusts, and stains are very hard to remove and most of the time those stains becomes permanent. If it’s the white one, I’d rather have a (super) glossy white finish. Like the micro-ATX design layout, it also lacks some holes or anchor points for cable management. And I also would prefer that the front I/O ports would not be attached to the side panel.
That’s basically it, so if I were to choose between the Phenom and Prodigy, I would go for a black Prodigy that has a mini-ITX layout. It’s much easier to work with and definitely more spacious than the micro-ATX variant. But that doesn’t mean that the Phenom doesn’t have a good outer design. It’s a matter of personal preference and I simply prefer the Mac Pro-looking design. The BitFenix Phenom Mini-ITX case is a great case and I can definitely recommend this one, specially if you are planning to build an ITX system.