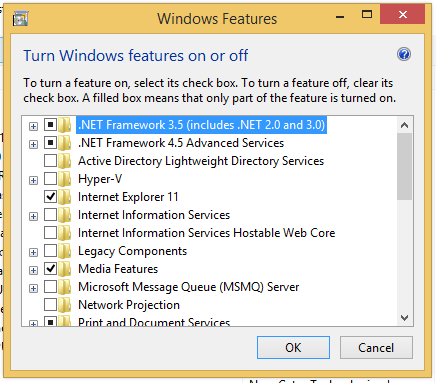
There are some programs or applications that require the old (dot Net) .Net Framework 3.5. Some requires the later 4.0 and 4.5. By default, .Net Framework 4.5 is already integrated in Windows 8 and 8.1. However that is not the same with Framework 3.5. You can activate 3.5 by going to Programs and Features, then Turn Windows features on or off and select or turn on the .Net Framework 3.5 feature. But the problem is it will require you to have an internet connection. It will try to connect to the internet and download the entire thing. So, how can you add or install the .Net Framework 3.5 without an internet connection? In this article, I’ll show you simple steps on how to install and activate .Net Framework 3.5 in Windows 8 and 8.1 without the need of an internet connection.
How To Install .Net Framework 3.5 in Windows 8 / 8.1 Offline Method
This method does not require you to have an internet connection, but this requires the original Windows installers. It is not important if your Windows installer is in a DVD or an image ISO or it’s in a USB drive. The important thing is that it’s a full installer and you can copy files from it.
To install .Net Framework 3.5 in your Windows 8 or 8.1 computer, access your Windows installer and look for the folder named “Sources“. Open it and look for another folder called “SXS“. Inside that folder you will see a bunch of files, now leave that window opened, and open other windows.
This time, create a folder in drive C:, name it whatever you want, but for this example let’s name the folder “net35“. After you have created the folder, go back to the SXS folder in your Windows installer and copy all files from that folder and paste it inside the net35 folder that you have created.
After you have copied all files, access Command Prompt and be sure you are running the Command prompt as an Administrator. To do this, simply hit the Windows Key + X on your keyboard. A menu will appear near where the start button is, and select “Command Prompt (Admin)“. This will run Command Prompt with Administrator privileges.
Once the command prompt is opened, type the following command below and hit enter:
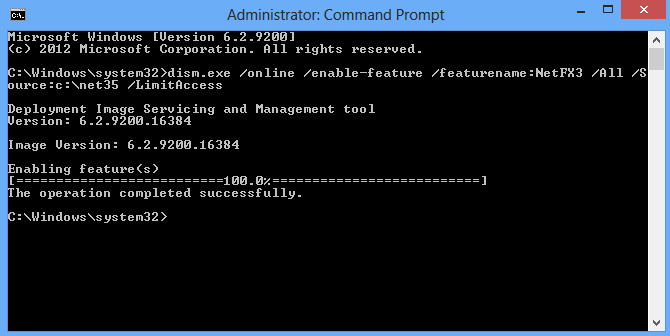
dism.exe /online /enable-feature /featurename:NetFX3 /All /Source:c:\net35 /LimitAccess
If you noticed, after the “Source:” is the location of where the files inside the SXS are located. In this example the folder “net35” was created in drive C:
Alternatively you can do this without creating and copying the files and just directly point the source to the Windows installer:
dism.exe /online /enable-feature /featurename:NetFX3 /All /Source:[Drive letter of Windows Installer]:\sources\sxs /LimitAccess
After you have successfully done this, you should get a “100% The operation completed successfully” message in the command prompt. .Net Framework 3.5 is now installed and activated in your Windows 8/8.1 computer and you should now be able to install the software or application that requires dotNet Framework 3.5.
If you find this article helpful, please do consider sharing this article with your friends or network. Follow and subscribe as well to get the latest news and tech deals.