AMD’s upcoming next-gen desktop processor, the Ryzen 9000 series based on the new Zen 5 architecture, is coming soon. If you’re currently using an Asus AMD 600 series motherboard, like X670(E), B650, or A620, then there’s no need to buy or upgrade to a new motherboard since most of the 600 series motherboards will support the Ryzen 9000 CPUs via a bios update. Asus has announced the supported model list, and in this article, we’ll list what Asus motherboards will support the upcoming Ryzen 9000 desktop CPUs.
Asus AMD 600 Series Motherboards Now Support Next-Gen Ryzen 9000 Processors
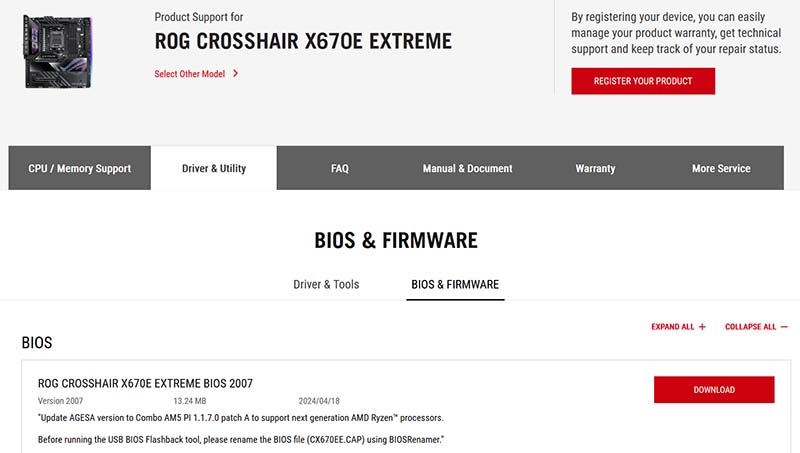
The BIOS update that will enable support for the upcoming AMD Ryzen 9000 Zen 5 desktop processor is the AGESA version to Combo 1.1.7.0 patch A.
Users need to visit and download the BIOS from the official product page of their Asus motherboard. The BIOS is located under the Driver and Utility section of the motherboard’s product page.
Below are the Asus 600 series motherboards that support AMD’s next-gen CPUs via a BIOS update. The motherboards are listed according to their tier, with ROG motherboards at the top and Prime, EX, and AYW models at the bottom.
Compatible Motherboards
| Product line | Model Name | BIOS FlashBack |
|---|---|---|
| ROG | ROG CROSSHAIR X670E EXTREME | Yes |
| ROG CROSSHAIR X670E HERO | Yes | |
| ROG CROSSHAIR X670E GENE | Yes | |
| ROG STRIX | ROG STRIX X670E-E GAMING WIFI | Yes |
| ROG STRIX X670E-F GAMING WIFI | Yes | |
| ROG STRIX X670E-A GAMING WIFI | Yes | |
| ROG STRIX X670E-I GAMING WIFI | Yes | |
| ROG STRIX B650E-E GAMING WIFI | Yes | |
| ROG STRIX B650E-F GAMING WIFI | Yes | |
| ROG STRIX B650-A GAMING WIFI | Yes | |
| ROG STRIX B650E-I GAMING WIFI | Yes | |
| TUF GAMING | TUF GAMING X670E-PLUS WIFI | Yes |
| TUF GAMING X670E-PLUS | Yes | |
| TUF GAMING B650-PLUS WIFI | Yes | |
| TUF GAMING B650-PLUS | Yes | |
| TUF GAMING B650-E WIFI | Yes | |
| TUF GAMING B650M-PLUS WIFI | Yes | |
| TUF GAMING B650M-PLUS | Yes | |
| TUF GAMING B650M-E WIFI | Yes | |
| TUF GAMING B650M-E | Yes | |
| TUF GAMING A620-PRO WIFI | Yes | |
| TUF GAMING A620M-PLUS WIFI | Yes | |
| TUF GAMING A620M-PLUS | Yes | |
| ProArt | ProArt X670E-CREATOR WIFI | Yes |
| ProArt B650-CREATOR | Yes | |
| PRIME | PRIME X670E-PRO WIFI | Yes |
| PRIME X670-P WIFI | Yes | |
| PRIME X670-P | Yes | |
| PRIME B650-PLUS | Yes | |
| PRIME B650M-A WIFI II | Yes | |
| PRIME B650M-A WIFI | Yes | |
| PRIME B650M-A II | Yes | |
| PRIME B650M-A | Yes | |
| PRIME B650M-A AX II | Yes | |
| PRIME B650M-A AX | Yes | |
| PRIME B650M-A AX6 II | Yes | |
| PRIME B650M-A AX6 | Yes | |
| PRIME B650M-K | Yes | |
| PRIME B650M-R | Yes | |
| PRIME B650M-F | Yes | |
| PRIME A620-PLUS WIFI6 | No | |
| PRIME A620-PLUS WIFI | No | |
| PRIME A620M-A | Yes | |
| PRIME A620M-E | No | |
| PRIME A620M-K | No | |
| EX | EX-B650M-V7 | No |
| AYW | A620M-AYW WIFI | No |
Two Ways to Update an Asus Motherboard’s BIOS
There are two ways how you can update an Asus motherboard’s BIOS. Not every motherboard features these, but most Asus motherboards have BIOS Flashback and EZ Flash BIOS Features.
Asus BIOS Flashback vs. EZ Flash, What’s the Difference and Which is Better?
The easiest way to update the motherboard’s BIOS is via the BIOS Flashback feature. You only need the motherboard to be connected to a power supply. In fact, it doesn’t even need the CPU, memory, or storage installed. Only the motherboard connected to a power supply and a USB flash drive are required.
If your PC is already built with all the components installed, there is no need to remove or uninstall them (CPU, GPU, memory, etc.). Asus just wants users to know that with the BIOS Flashback feature, you can update a motherboard even without the main components.
On the flip side, you will have to rely on the LED indicator since there is no display output. There’s no need to go into the BIOS, as the motherboard will handle the updating processes.
Meanwhile, the system must be up and running if you use the EZ Flash method. You will update the BIOS by entering the motherboard’s BIOS menu and selecting EZ Flash. You’ll still need a flash drive, but with this method, you’ll see the status of the BIOS update through the monitor.
Below are the steps on how to update the Asus AMD motherboard via BIOS Flashback or EZ Flash method.
How To Update Asus Motherboard using BIOS Flashback
Before updating the motherboard’s BIOS, you need to prepare a few things. First, you will need a USB flash drive, which should be formatted in FAT32. An uninterruptible power supply (UPS) is also advisable because a power interruption could corrupt the BIOS update and damage the motherboard. The UPS is not required, but it is advisable to be safe.
Step 1: Download the correct UEFI BIOS
Visit the Asus motherboard’s product page and go to the support section. Download and extract the latest BIOS *.CAP file.
An example of the latest BIOS update supporting the Ryzen 9000 desktop CPU should say, “Update AGESA version to Combo AM5 PI 1.1.7.0 patch A to support next-generation AMD Ryzen™ processors.”
Step 2: Rename the BIOS file and copy it to the flash drive
Once you have downloaded and extracted the files, run or open the BIOSRenamer.exe. A window will appear, and the BIOS file *will be renamed for you. Alternatively, you can also rename the BIOS file, but be sure to name it correctly, according to Asus’ instructions.
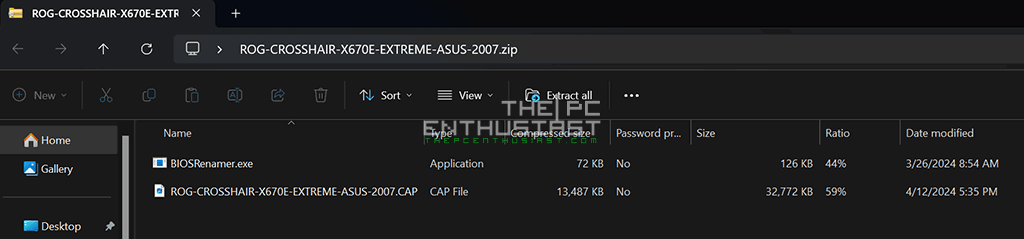
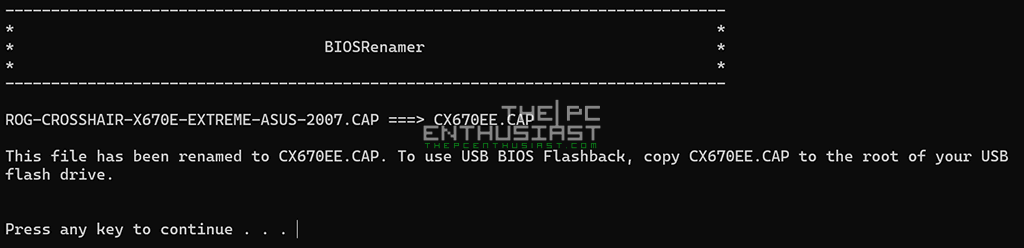
After you have renamed the BIOS file, copy the file (*.CAP) to your flash drive.
Step 3: Shutdown your system and keep the power supply connected
Step 4: Connect the USB storage device, then press the relevant button to complete the BIOS update
Plug the USB storage device into the motherboard’s USB BIOS Flashback port. After that, press and hold the BIOS button for three seconds or when the LED starts blinking. When the LED begins to blink, release the button.

At this point, do not unplug the power, do not turn on the computer, do not remove the USB device, or do not press the CLR CMOS button. The motherboard is still updating the BIOS. The BIOS updating process is complete when the light goes out.
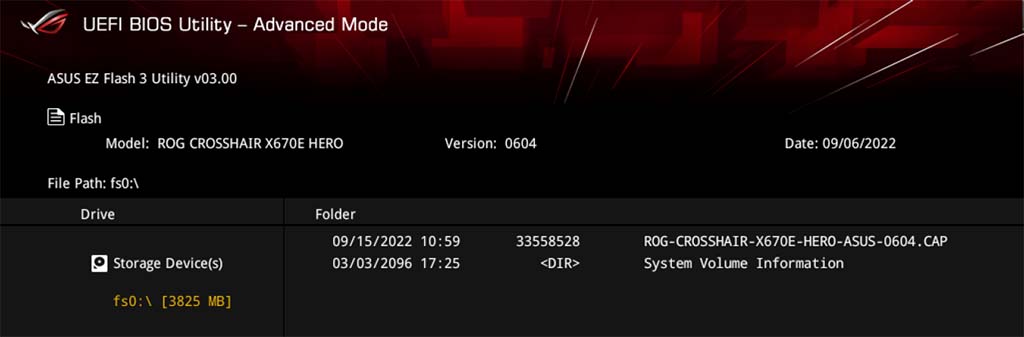
How to Update Asus Motherboard BIOS via EZ Flash 3
1: Insert the USB flash drive that contains the latest BIOS file into the motherboard’s USB port.
2: Open the BIOS in Advanced Mode (F7) and go to the Tool menu. Select ASUS EX Flash 3 Utility and press Enter.
3: Press the Left arrow key to switch to the Drive field.
4: Press the Up/Down arrow keys to find the USB flash drive containing the latest BIOS, then press Enter.
5: Press the Right arrow key to switch to the Folder Info field.
6: Press the Up/Down arrow keys to find the BIOS file, and then press Enter to perform the BIOS update process. When the update process is complete, reboot the system.